Custom Resolution Utility

 (57 votes, average: 3.04 out of 5)
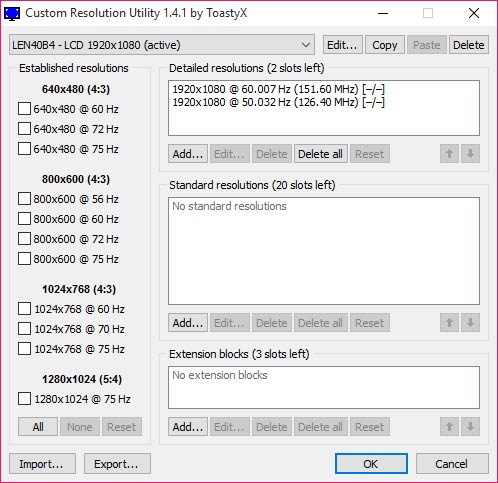
About Custom Resolution Utility
Monitors advertise a fixed list of resolutions and refresh rates through a small data block called EDID, which Windows reads on every cold boot and treats as gospel. Custom Resolution Utility is the tool that lets you rewrite that data block at the driver level, telling Windows your display can do more than its factory profile claims. Higher refresh rates, non-standard resolutions, tighter timings, support for HDR or 10-bit color, all of it lives inside that EDID, and the application is essentially an editor for it.
The headline use case is monitor overclocking. A panel rated for 60 Hz that’s physically capable of 75 Hz, a 144 Hz display that runs stable at 165 Hz, a 1080p screen that holds 1440p downsampled.
None of those work through normal Windows display settings because the OS won’t offer a mode the monitor didn’t declare. Override the declared modes through the application and the OS suddenly has options it didn’t have before.
This is a power-user tool. It’s small, it has no installer, and it assumes you understand what pixel clocks and front porch values are, or that you’ll figure it out by breaking things and fixing them.
How the EDID override actually works
The application doesn’t talk to the monitor. It writes an override to the Windows registry that the graphics driver reads instead of the monitor’s real EDID. When the driver restarts (or after a reboot), it presents the modified profile to the OS as if it came from the display itself. The monitor itself stays untouched.
That’s an important distinction. Nothing is being flashed to the panel. If you make a mistake, the override sits in a registry entry that can be removed without touching the hardware.
The application ships with a reset utility, a small executable that wipes all CRU-created overrides and forces the driver to re-read the real EDID on next restart. Run it from a working second display, from safe mode, or from a different user account if your primary one is stuck at a black screen.
Detailed timing controls
Adding a resolution isn’t just picking a pixel count. Each mode needs a complete timing definition. The application exposes the lot: horizontal and vertical active pixels, front porch, sync width, back porch, polarity, pixel clock. Three standard automatic calculators are built in, covering automatic LCD standard, automatic CRT standard, and automatic HDTV. For most monitor overclocks, automatic LCD standard generates safe defaults you can adjust from.
Reduced blanking is the timing variant that matters for high refresh rates. By shrinking the blanking intervals between active pixel periods, the same pixel clock buys you more refreshes per second.
Reduced Blanking v2 is the tighter variant, supported on most modern panels and DisplayPort connections. The application lets you swap between blanking modes per detailed resolution, which is how you push a panel from 144 Hz to 165 Hz without overrunning its actual pixel clock ceiling.
Standard, extension, and audio blocks
Beyond detailed resolutions, the application edits the rest of the EDID surface. Standard resolutions exposes a list of common modes the monitor claims to support, separately from the detailed timings. Extension blocks cover HDMI and DisplayPort specific features including audio formats, video data, color spaces, HDR metadata, and FreeSync ranges.
Editing the FreeSync range block is one of the legitimately useful applications outside pure overclocking. Many monitors ship with a narrower advertised FreeSync range than the panel actually supports, and widening that range gives you variable refresh rate coverage across more framerates. It’s a specific, audience-narrowing use case, but it works.
Audio data block edits matter when a TV or monitor is dropping the wrong audio formats. You can force or disable specific formats by adding or removing entries.
Recovery, the reset utility, and what to do when it goes wrong
You will get a black screen at some point if you use this tool seriously. The standard recovery path is the reset executable that ships with the application. Run it, wait fifteen seconds, restart the graphics driver with Ctrl+Win+Shift+B, and the override is gone.
If that fails, safe mode boots Windows with a generic display driver that ignores EDID overrides entirely, which gets you back into the OS to fix things. Plugging into a different output (HDMI instead of DisplayPort, or vice versa) sometimes works because each input has its own EDID override entry.
Keeping a second monitor connected for fallback is the standard precaution. For a deeper graphics-driver reset when the override has somehow corrupted driver state, Display Driver Uninstaller is the standard tool for a full clean before reinstalling the driver.
Per-GPU and per-output behavior
The override is tied to the EDID identifier reported by the connected display, which means it follows the monitor across cable swaps as long as the EDID itself doesn’t change. Connect the same monitor through a different DisplayPort cable, the override still applies. Connect a different monitor with the same EDID identifier (rare but possible with budget panels), it also gets the override, which can produce confusing results.
NVIDIA, AMD, and Intel integrated graphics all read the override the same way, since the mechanism lives at the Windows driver level rather than vendor-specific. For NVIDIA users this is significant because the in-driver custom resolution dialog has tighter restrictions than the EDID override path. AMD’s Radeon Adrenalin software has its own custom resolution panel, but it stops short of full timing parameter access.
For GPU-level tweaking and monitoring alongside the CRU workflow, tools like MSI Afterburner and GPU-Z cover the hardware side while the application handles the display side.
Where the application falls short
There’s no validation against your specific panel’s actual capabilities. The application will let you write a 240 Hz override to a 60 Hz panel and Windows will happily try to drive it, at which point you get the black screen recovery process. The tool doesn’t know what your display is physically capable of, only what timings produce a mathematically valid EDID.
The interface is also stark. Every value is a number in a text field, every block is a separate dialog, and there’s no preview of what the resulting display profile will look like. The learning curve is real, and most users figure things out by trial, error, and Googling pixel clock values for their specific monitor model.
It also won’t help if your monitor’s scaler hardware physically can’t accept the new timings. Some panels refuse out-of-spec signals at the scaler level even when the GPU is happily transmitting them. In that case you’ll see a “no signal” or “out of range” message on the monitor itself, which is the panel telling you no regardless of what the override claims.
Conclusion
Custom Resolution Utility is the tool for users who need control over their display profile that Windows and the GPU control panels simply don’t provide. Monitor overclockers, users with broken or incomplete EDID data from cheap panels, anyone trying to widen a FreeSync range or unlock a non-standard resolution, all end up here because no alternative offers the same depth at the same level of the stack.
The application rewards patience and punishes carelessness in equal measure. The recovery path is sound enough that you can experiment without permanent risk, but you will spend time troubleshooting timing values, particularly the first time you push a panel past its rated spec.
For users without the patience for that loop, the vendor control panels offer safer, narrower alternatives. For users who actually need what’s inside this tool, nothing else covers the territory.
Pros & Cons
- Direct EDID-level control unlocks resolutions and refresh rates the OS won't otherwise offer
- Recovery executable makes black-screen mistakes easy to roll back
- Detailed timing controls including pixel clock, blanking intervals, and reduced blanking v2
- Works across NVIDIA, AMD, and Intel graphics without vendor-specific drivers
- Edits FreeSync range, HDR metadata, and audio data blocks for niche fixes
- Tiny footprint with no installation required
- No validation against actual panel capabilities, so invalid timings produce black screens
- Interface assumes prior knowledge of display timing terminology
- No preview of how the override will behave before applying
- Some monitor scalers reject out-of-spec signals regardless of GPU output
- Reset workflow requires a working second display, safe mode, or the keyboard shortcut
Frequently asked questions
It writes an EDID override to the Windows registry that the graphics driver reads instead of the monitor's factory EDID. Nothing is written to the monitor itself, and the change can be removed with the included reset executable.
Yes, that's one of the main use cases. By writing timings with a higher refresh rate to the EDID override, the OS becomes able to select rates above the panel's advertised maximum. Whether your specific panel accepts the signal stably is a separate question that depends on the hardware.
Run the included reset executable from a working second display or from safe mode. It clears all overrides and forces the driver to re-read the real EDID. You can also restart the graphics driver with Ctrl+Win+Shift+B before rebooting.
Yes. The override is read at the Windows driver layer, so it applies to all three vendors without needing vendor-specific configuration.
The signal the GPU is now sending exceeds what your panel's scaler will accept. The GPU is happily following the new timing but the monitor itself is rejecting it. Lower the values or use a more conservative timing standard.
It's a timing variant that shrinks the inactive intervals between pixel periods, freeing pixel clock headroom for higher refresh rates. Use it when you're pushing refresh rates close to the connection's bandwidth ceiling. Reduced Blanking v2 is the modern variant and works on most current panels and DisplayPort connections.
Yes. Editing the FreeSync range extension block lets you widen the advertised variable refresh rate window beyond what the monitor declares, assuming the panel actually supports the wider range. Plenty of displays ship with conservative ranges and respond well to widening.